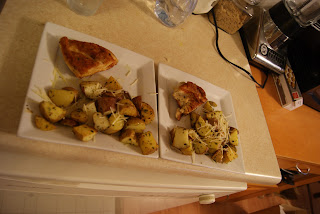
Salt Bark Chicken and Italian Fried 'Taters
Good evening! So I figure it is high time that I finally put a cost-efficient recipe up on my blog! As I was starting dinner tonight I was slapped in the face with the epiphany that the meal I was making would be a perfect recipe to share with all of you!
I am quite proud to say that it is a creation of my own making and over the past year I have perfected it to the point of food-ecstasy. Tonight's rendition was the best yet and I have hopes that it will only get better from here. The best part of this meal is that it is incredibly easy and incredibly cheap. I don't typically use exact measurements and recipes, but I will do my best to provide you with one. Let's begin, shall we?
**You'll see that the instructions are rather wordy. I write this mainly for beginning chefs and the extra hints, tips, and descriptions are geared towards them. For those of you who are well-taught in the ways of cooking, please feel free to skim for the important parts - it's a fairly straight forward recipe and easy to put together if you have some experience in the kitchen. **
Ingredients
- 1 Chicken Breast per Person
- Salt and Pepper
- Extra Virgin Olive Oil (If you're not worried about calories, veggie oil makes it even better!)
- 6-9 Medium sized golden and red New Potatoes
- Oregano
- Garlic Powder
- Rosemary
- Basil
- Red Pepper
Step 1:
The first thing that you have to do, for the sake of timing, is take your new potatoes and dice them into cubes just under an inch in size. Toss them into a fry pan with enough Extra Virgin Olive Oil - or as my good friend (not really) Rachel Ray calls it, E-V-O-O - to lightly coat the majority of the potatoes. It might take a few attempts to perfect the amount of oil you need. You don't want it too dry because it might burn the potatoes. On the other hand, too much makes them overly oily and quite soggy; and no one likes soggy potatoes.
As soon as you start the potatoes, you need to put enough EVOO to lightly coat the bottom of a fry pan. Heat the oil over medium-high heat until it starts to shrink away from the edges of the pan - you'll think I'm crazy until it happens and you'll know exactly what I'm talking about. Once that happens, plop your chicken breast right into the pan and get your hand out of the way. The chicken should start hissing and spitting and you don't want to get burned with hot oil. *If your chicken doesn't start sizzling immediately, fear not, it will in a few minutes.
Sorry, no pictures for this step. Didn't hit me until the next step that I should do this blog and take picture.
Step 2:
After two minutes or so you'll be able to see the beginnings of a nice golden brown on the underside of your chicken. At this point you should take a healthy (by healthy I mean unhealthy) amount of salt and pepper and sprinkle it on the up-facing side of the chicken before flipping it over. Again, be careful of the firestorm of burning oil at this point.
This is the sight that will greet you upon first flipping of the chicken. It's already looking delicious, in an odd, raw-chicken sort of way. It's important not to forget about the potatoes. The trick with them is to find the balance between letting them sit, acquiring that nice golden brown and keeping them moving to prevent them from burning. This is something that cannot be taught over the interwebs and can only be learned through experience. If you burn your 'taters... fret not, because you'll get it. You just have to try again.
Step 3:
In order to get a good "bark" on your chicken, you should be flipping it every two or three minutes, applying a nice coat of salt and pepper each time. Now after you flip the chicken for the second time, your potatoes will be about ready for seasoning. All you have to do is take your spices (oregano, salt, pepper, red pepper, garlic powder, rosemary, and basil) and sprinkle them over the spuds and toss them a few time to evenly disperse the flavors. They should look a little something like this:
Step 4:
By now you have your pattern down. Flip the chicken, coat in salt and pepper, stir the 'taters. Unfortunately, you'll soon find that the temperature on your chicken has stalled out around 140 degrees. Technically speaking, they generally recommend that chicken be cooked to a temperature of 165 degrees. This is where you employ the handy-dandy cookie sheet trick. Take an old cookie sheet and set it on top of the fry pan in order to trap in some of the extra heat and put that temperature back on the rise.
A little word to the wise, when you go to flip your chicken (because you'll still need to flip it in order to prevent it from burning the bark) remove the cookie sheet with some tongs. That cookie sheet gets surprisingly hot as it sits there.
As for the 'taters, turn down the heat and makes sure to move them every now and then until the chicken gets up to temp.
Step 5:
Now that your 'taters are done and your chicken is up to temp it's time to plate it up and chow down! The whole process is only going to take 15-20 minutes before your sitting down at the table and stuffing your face with delicious food :) I hope you enjoy!


No comments:
Post a Comment