Showing posts with label DIYs. Show all posts

Pallet Display Shelf

Alright everyone, as promised I have already started in on my laundry list of DIY projects, and after completing my first major one I figured I do a little post about it.

Reina had been bugging me for a while now to help build her a nice display shelf for all of her awesome things (she has tons of trophies being a really awesome Miss America Organization contestant - shout-out, she took 2nd place at Miss Washington this year!!!). We looked around online - and by online I mean Pinterest - and came across this little gem of a project. To be completely honest, I'm not sure who is the original creator of this design, but whoever it is, I give mad props to them because it looks amazing!

Before we get started I'll show the finished project first, so you'll be able to understand just how much you want to do this project. After you've basked in it's glory for a second or three I'll take you back to the very beginning and work you through it step-by-step all simple like.

Pretty awesome, huh?
I wish I had a picture showing the view of her dining room looking down the table, it completely changed the set-up and mood of the room. Personally, I think that's the best part about this particular project - the fact that such a ridiculously simple piece can completely transform your room into a professionally-designed look.

Alright, let's dive in shall we?

Bill of Materials (B.O.M.)

  • 2 pallets 
    • Technically you only need one, but more often than not the pallets you can get for free (at your local RiteAid or grocery store) are a little banged up and it's helpful to have an extra to take boards from.
  • Nails
  • Hammer
  • Wood Stain
  • Brushes of varying sizes
  • Drywall Anchors
    • These can be found in the "Fasteners" section of your local hardware stores. 
    • ***Be extra sure to make sure it's okay with your landlord to use these if you live in an apartment. They tend to make a pretty good mark in the drywall that can easily be covered in Spackle, but some places still say negative on drywall anchors. Unfortunately, I don't know of another way to fasten something this large on a wall...
  • Drill
  • Screwgun
Overall, the only out of pocket costs you should have - assuming you have the 10 Tools Every Man Should Own - will be the cost of stain, possibly brushes, and the drywall anchors. For us it was about $12, I think. A pretty fair price I'd say for the size of the project. 

Step 1: Making it look "pretty."

One of Reina's favorite requirements for the DIY projects we do together is that I make sure to "make it look pretty." Depending on the condition of your pallet, this step will vary in terms of time. Be sure to pick the better of your two pallets (common sense, I know) to use as the shelf. Look it over and make sure all the boards are there and that they're in good condition. 

A few things to note:

  • The Top of your Pallet: When I say "top" I'm referring to the surface that you would stack items on if you were using this pallet for normal uses. It is important to make sure all of the slats are there and in good condition. You don't want them to have any big splits because these are the boards you'll be using to attach it to the wall. Make sure all the boards are in great condition because you never know which one's you'll have to use until you actually go to hang it on the wall - trust me, I know.
  • The Bottom of your Pallet: The "bottom" is the part of the pallet that will be facing you when it is on the wall. This is your "shelf." Likewise, you want these boards to be in good condition because you don't want your vase, picture frame, or trophy breaking the board and falling to the ground. Technically speaking the middle crosspieces of the pallet will be your shelf, but the true bottom boards are just as important because they are highly visible. 
Now on ours, as you can see above, there were some chalked numbers that we wanted to make disappear. A sheet of 100 grain sandpaper (this, I just had laying around) and some elbow grease quickly made this happen. It doesn't take very long and if you don't want anything other than the actual wood showing, it's a good step to take. It's one of those "extra steps" that can really add a little bit of professionalism to your home. 

Extra Step: Cover Fork Grooves

This normally wouldn't be a step that I'd include, but it was a problem we ran into and I figure some of you out there might too. Our pallet had grooves on the crosspieces - the shelf part - that were for the forklift forks. Obviously we wouldn't be needing them and they diminished our shelf space significantly. If you're in the same position, there is no need to worry. As it turns out, the space between the bottom and top boards is exactly the width of a "top" slat. And, if you have an extra pallet, you can just pull two off of that and nail it down to the grooved crosspiece. 

Just use the back-end of a hammer to pry off the slats
You can still see the groove, but I think that it adds to it.

Step 2: Stain

Much like the first step, this one is almost disgustingly easy. All you need to do is cover your pallet in stain, and you don't even have to do the top side of the pallet because it will be against the wall. If you're thinking about doing it just because, I'd actually recommend against that decision. I'm not sure, but I worry about some of the stain marking up the wall; and that might make your landlord a little upset when it comes time to move out. Spackle is easy to look over, but brown scuffs all over the wall might make him/her a little irritated. As always though, your call!


Step 3: Hang!

After you've let your pallet dry over night it's finally time to hang it on the wall. Unfortunately it's a rather ungainly thing and you'll definitely need a second set of hands to help you hold it in position while you mount it. As such, I wasn't able to get any pictures of the actual mounting process, but it's fairly straight forward. Those drywall anchors you got at your local hardware store is rather self-explanatory and they have directions besides. Then you need to pre-drill your pallet before trying to screw it into the wall, you don't want your boards splitting the second you let go. This is the part that gets kind of tricky, but I have faith in you, you can do it.

Then you just drive the screws through your guide-holes and into the anchors. After that.... you're done! 

Please post pictures of your own! 


You're now the proud owner of your own pallet display shelf, unless you were just reading this because you saw it somewhere. In that case, go out and get some pallets and refer to the top of the page! 

As with any of the projects I post on here, if you have any questions, please don't hesitate to fire me an email or leave a comment and I'll get back to it as soon as possible!

Hope you all enjoyed it!

Cheers,

Upcoming DIYs!

Hey everyone! I know I've been really slacking on my DIY and money-saving tips/tricks, but it's been a pretty crazy start to the summer. Fear not however because I have not forgotten and I have a ton of fun things planned for the second half of summer!

Before I get to that though, I just have to give a HUGE shout-out to my fiancee who will be competing in the prestigious and awesome Miss Washington pageant in only 10 DAYS!!! No matter what happens I will be so incredibly proud of her (but between you and I, I think she's got a pretty stinkin' good chance!). So the next few days I'll be busy helping her prepare for all the festivities that start in a week. If you want to learn a little bit more about her or the organization in itself, you should definitely check out her blog. You can find that here.

Okay, thank you for humoring me. After I get back from the pageant in Renton (and even a little before that), the DIY projects will be in great abundance!! I'm taking this Friday-Sunday off and going to visit my grandparents/watch the pageant and I'll be spending almost an entire week working in my grandfathers shop doing this and that preparing for and even completing some of my up and coming projects. Needless to say, I'm pretty friggin' stoked!

Below are a few of the projects I want to do before school starts again in September. For those of you who simply cannot wait for me to do them and offer my own tips and tricks, most of the ideas come from Pinterest so cruise around on the to find these and many more projects to get started on!


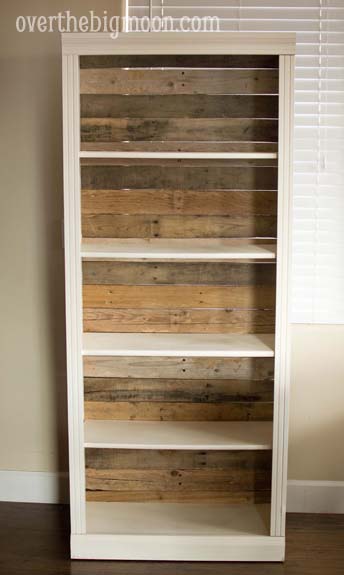
  • PALLET BOARD BOOKSHELF

I find myself always bringing home books - I think it's some sort of disease or something - and as a result, I am in desperate need of new bookshelves. As a writer/English Major I need to have a stylish and personalized library area and so I have decided to spruce up my bookshelves to add a little of myself to them. Super stoked for this one!

photo and idea come from overthemoon.com!

  • CEDER-LINED CIGAR/JEWELERY/ANYTHING BOX

Ever since I was a little kid I've been fascinated with little trinket boxes. I was always saving up money and buying ones to put this and that in. I distinctly remember getting one with the stereotypical trashy wolf howling at the moon glossed on the cover. This and my recent interest in the casual cigar experience has led me to finally getting around to building my own. I hear these can be kind of tricky in terms of getting them all nice and square... but hey, that's what makes it personal right?? Sure hope so... 

eventually i hope to make one this intricate, but mine first one
will probably be much more simple

  • PLATFORM BED RISER

This one is probably going to be my biggest project of the summer, and is definitely the one I am looking forward to the most. As always with apartment living, I am hard-pressed for storage space and frankly my bedroom is a little unorganized. I like cool looking beds and this would definitely make my bedroom more trendy and efficient. This will probably end up taking me a weekend or two, which means I might be sleeping on the floor for a week or so (motivation to get it done I guess!).

more bookshelves! thank you pinterest.. and whoever pinned this first!

  • HANGING STORAGE FOR POTS AND PANS

One of the biggest problems every kitchen - no matter how big or small - faces is how to store your pots and pans. They take up an obnoxious amount of space and no matter what, there doesn't seem to be any good place to store them. Until now that is... Reina has a pageant friend who's brother is incredibly awesome at home decorating apparently and I'm and going to shamelessly steal his idea. The picture below is the closest I could come to finding what it'll be like. He basically took a really sturdy tree branch and hung it from the ceiling in his kitchen area and hung pots and pans from it making it an incredibly good lucking and effective way to store your pots and pans!

sorry this isn't exactly what i'm going to do.. but it's close enough to get the picture
There will probably be a few more little ones here and there, and hopefully a few money-saving tips and tricks as well but these are my major projects for the summer. If you have any ideas or requests for projects that you would like to see me try, definitely leave a comment below and I'll see if we can make it happen!

Cheers everyone, 

Spring Time is Here!... I think.

ugh....shwaaaat???
Two days ago marked the very first day of Spring 2012, ushering in the season of awakening, gardening, DIY projects, and a general Go Green mentality.  Apparently, the local weatherman apparently missed the memo because today I woke up to two inches of fresh snow on my mini-lawn.  Here in Spokane, the locals always count on one last attempt by Old Man Winter around this time before the season actually turns in for the year.  I sure hope so because I am not one of those people who get all excited for snow... or cold weather in general.  I prefer 60s weather with buds on all the trees and the first stirrings of green in the yards.  Rumor has it we're getting close though so for those of you like me have hope!

With the onset of Spring also brings the height of the Miss America Organization pageant season. *(For those of you who are now completely confused, I am blessed to have a wonderful girlfriend who happens to compete in the Miss America Organization and uses her many talents to benefit the community, the organization, and the environment.)  It just so happens that pageant season comes around the same time that spring does; and with spring Reina's work with her platform - Sustain-Ability: Impacting Tomorrow, Today.  As a part of that work, she is kicking off a 30 Blogposts to Help YOU Go Green Campaign today.  Her month of attempting to be as green and sustainable as possible has inspired me to try and do better on a lot of the simple things in daily life. Therefore, I will be sharing my hints, tips, and tricks with you much like Reina is.  You can check hers out here and if you email subscribe to my blog, follow me on Twitter (@connoragriffin), or find me on Facebook you'll constantly annoyed with links to my latest posts:)  Below is my first post; which is really more of a challenge than anything:

30 Days Without Disposable Containers


I work at a locally owned coffee shop here in Spokane (Forza Coffee Company on 29th and Regal - you should totally come check it out sometime) and was struck stupid one day by how many sleeves of paper and plastic cups we go through in a week.  As a huge coffee fanatic I went on to realize that it wasn't just my shop that customers are walking out of with this disposable cups.  It's the Starbucks down the street or the other local shop across the street and all of the other coffee shops in town and across the country.  Worse than that is that it's not only faceless "customers" who do it; its ME too!!!

At this point it is of utmost importance to clarify that I am not attacking these coffee shops, restaurants, and convenience stores who sell drinks in these cups.  I'm not attacking anyone.  But to be completely honest, it is us as the consumer who is responsible for all of this waste.  And if you're curious about what I mean by "all this waste" let me present a few facts to you:

  • Worldwide 430 trillion (430,000,000,000) plastic bottles and containers (Bs&Cs) are thrown away each year.  That translates to roughly 140,000 per second.  These plastic Bs&Cs take over 200 years just to start decomposing! 1
  • The United States threw away 3,810,000 TONS (7,620,000,000lbs) of plastic Bs&Cs - roughly 190 billion units.  That's about 605 units per person, per year.1
I'm not sure about you, but as an English major, all those zeroes has my head spinning.  And that's just plastic containers. That does NOT include the paper cups that are the most common to-go containers for warm drinks in the U.S. Wrap your head around that! 

My "trusty Nalgene".. My Forza mug was
in the car and due to snow I didn't
want to go get it:)
After realizing that feeding my coffee... or two-a-day habit along with the other beverage items (sodas, juices, water, etc) that I purchase during the course of a month was directly contributing to these staggering figures I decided it was time to make a difference.  Don't get me wrong, I realize that my month of not using disposable containers is more likely than not to have no concrete impact whatsoever on these national figures.  Where it will have an impact is in my local dump and immediate environment.  That's 50 containers, give or take, that are not going into the dump.  Might not seem like much but more and more people are realizing that it's not going to be the politicians and "environmental agencies" that will make a global impact; it's going to be hundreds of thousands of individual efforts coming together for the collective good - and this is my contribution to that collective good.

Therefore, starting right. now. I will be forgoing all disposable drink containers for the next month instead using my trusty Nalgene bottle and Forza travel mug. I promise to use these when I have them or simply pass on the beverage if I don't.  In this effort it is my desire to make an individual impact on my local environment.  It is here that YOU can help me:

Join Me.

All it takes is a BPA-free water bottle and a travel mug if you're a warm beverage drinker.  If you don't have one or more of these (which in today's America would be incredibly surprising) you can set yourself up with a great Nalgene from Amazon for about $102 and Target sells cheap, easy, dishwasher-safe travel mugs for under $103 as well.  

There are no excuses for not doing this.  If the $20 bucks is a monumental issue (and hey.. I'm a college kid, I understand if it really is) think of it this way: Most coffee shops and convenience stores give you a discount ranging anywhere between $.10-.25 for bringing in your own cup.  If you use it every day that adds up to about $7.50.  That's roughly three-fourths of your "start-up costs" and in two months you'll have paid for it and then some.  Not to mention you get to be hip and trendy... go you hipster, you.

So what will you do then? I'm not saying that you have to do this to have an impact on your environment (it does help though!).  There are tons and tons of quick easy things you can do in your everyday life that can make a difference and I'll be posting a lot of those throughout the next 30 days.  Think about it; I implore you.  Question your excuses and ask yourself "what's really stopping me?" So I ask beg you...

Join Me.


Post a comment below if you are taking the challenge with me, are curious about more info, or simply have a question of feedback.  Comments always make bloggers happy!

Until you read again,
Connor


(Okay, okay... like I said, I'm an English major and we're a stickler for where we got our information so here it is)

1"Fast Facts." Earth Distributer. 2011. Web. 22 Mar 2012.
2http://www.target.com/s?searchTerm=travel+mug&category=0%7CAll%7Cmatchallany%7Call+categories
3http://www.amazon.com/s/ref=nb_sb_ss_i_4_7?url=search-alias%3Dgarden&field-keywords=nalgene+bpa+free+water+bottles&x=0&y=0&sprefix=nalgene%2Cgarden%2C358 

10 Tools Every Man Should Own

Hey folks... mainly guys... got a post here that I think will be pretty helpful for anyone wanting to do some DIY stuff around the house, apartment, yard, or car.  I got to thinking if I'm going to be posting things on how to do whatever-improvement projects yourself you might need a few tools.

Luckily my Dad and Grandad were always including me in projects and teaching me how to use tools. Once I started hitting high school and driving my own vehicle I decided to ask for tools around Christmas and birthday time.  A few years later I have a pretty good collection of tools for a guy my age.  However, when I moved into an apartment this fall I realized that it wasn't going to be practical to bring my entire toolbox.  I simply wouldn't have anywhere to put it.  So, I filled up my little box with the tools I figured would be most practical (and as it turns out I used these tools on probably 95% of all DIY projects) and brought that with me.

As I get more in-depth and focused on specific projects, I find myself needed more specific/specialty tools.  There are 10 tools though that I draw from in almost each and every project I've ever done.  So, in turn, I've compiled a list of tools that I believe every man who calls himself a man should have.  Many will argue others need to be on the list, or that I've put something on here that isn't necessary but hey... these are just the tools I've used the most and have been most beneficial to me.


Starting off...

1. Tape Measure

In my opinion, the single most important thing a man can have.  If I ever hear a guy say "Oh, I'll just eyeball it"... so help me God I will smack him right in the face.  One thing I've learned the hard way is that if you don't measure something, and re-measure it.  It.  Will.  Not.  Fit.

You don't need anything fancy.  They make all sorts of different lengths and sizes and brands but I'll give it to you straight.  Get the cheapest one you can while still being able to distinguish the 1/8" and 1/16" marks.  If you don't know what I'm talking about....

2. Flat Head and Philips Screwdriver
 These two tools could arguably and probably beat out my first recommendation for most commonly used tools in the toolbox.  Whether you're opening something, hanging something, working on cars, or in the kitchen I almost guarantee that you'll need one of these guys.  Always keep these around.  I truly recommend having a set in your car, home/dorm, and wherever you work.  These things work not only as screwdrivers but as small pry-bars, paint jar openers, you name it.


3. Hammer
Basic tool? Yes.  Easier to use? More often than not, when working on a project, at some point you'll need a hammer.  Whether it be used to actually contribute to the project or act as a stress-reliever or "attitude adjustment device" I would always recommend having one handy.  The come in all shapes and sizes each one each one touting claims of better grip or better structure.  If you're a professional carpenter or a contractor that may matter.  But to you and I, any Ace Hardware or other locally owned hammer will do the trick.

4. Needle-Nose Pliers
Honestly, there isn't much to be said about this particular tool other than the fact that you need one.  They always come in handy, more often than not as a retriever than an actual tool.  By that I mean you drop something in a place where your hand doesn't quite fit... but your needle-nose does!  They're also pretty handy working with bailing wire or even electrical wiring (as long as the grips are wrapped in rubber!).


5./6. Wrench Set/Socket Set
If you have a car, truck, motorcycle, vacuum cleaner, or anything more sophisticated than a cardboard box... then at one point or another you're going to need one of these wrenches. They're designed for nuts and bolts and a lot of things in between.  The set I have run between 1/4" through 5/8".  This is pretty standard once again, this will be more than enough to suffice for anything you'll be needing outside some pretty extensive automotive work.  A socket set is more or less is the same thing as a wrench set with a few advantages and a few disadvantages.  The advantage is you can use them to tighten and loosen a bolt much quicker than you could with a wrench due to it's ratcheting ability.  The distinct disadvantage to a socket wrench is the fact that it has an incredibly limited facility in the sense that it's super hard to use as anything other than a socket.  A wrench on the other hand is easily converted to a make-shift hammer or pry-bar or any other creative device you may need.  While handy around the house this is definitely a group of tools that I use on automobiles more than anything else. You would be incredibly surprised at how much money you could save by having a set of tools to loosen a few bolts and replace a part.*
*A little known (or at least realized fact) is that more often than not that's all you're paying an automotive technician to do.  This is less so now I'll admit simply because automakers are designing dealer-specific parts which means only dealers have the unique tools needed to loosen/tighten certain things. But for those of you with older cars and/or a willingness to at least try it, you might as well save the money you'd be paying in "labor" (ie. tightening/loosening) since you're already paying for parts!

7. Channel Locks


8. Electric Drill
More often than not, an electric drill is a tool of ease rather than of necessity.  In my experience I use my drill as an electric screwdriver in order to save time and energy.  Is this strictly necessary? Arguably, no.  But let's get real here.  If you're spending all day building shelves for your closet or pantry you do not want to be putting in those screws by hand again and again.  Frankly you can't even afford the time it would take! In addition, you'd need to pre-drill those holes for the screws or else you're going to split your shelving materials.  That is where the electric drill becomes a necessity.  You can't exactly hand-bore these tiny pre-drill holes today.  I could keep talking but it would be rather pointless..  The simple fact is, you should get one of these.  Don't kid yourself and go out to the Home Depot and buy the latest model with an 18V lithium ion battery etc., etc.  The one I have pictured is an old one Reina's dad gave me.  I have to recharge the battery every hour or so but hey.. it was free and it works for almost everything I need it too.

9. Hex Wrench Set
If I had been writing this particular bit 5-10 years ago I wouldn't have put this particular tool on this list.  However, recently I'm beginning to see hex bolts more and more frequently.  Foreign cars definitely have them and surprisingly I've seen them in a lot of household items with "some assembly required".  So, despite only an emerging presence in the modern DIY sphere I'm including it in the must-have list.  I think than in the next five years or so we'll be seeing things requiring a hex wrench more and more.  Regardless, it's a handy thing to have around.  And on a side-note; to make it easier on yourself go to your local hardware store and pick up one of these all-in-one numbers like the one pictured. Otherwise you'll always be loosing track of them - especially when you need one in particular.

10. Multi-tool/Leatherman
If you're a man, and you don't already have one of these... you can't call yourself a man.  You should also immediately get up from you computer and get one from your local hardware store.  You're still here.... Oh, you've already got one? Good for you man.  There really isn't much to say other than the fact that is hands down one of the most useful and practical tools a man could ever own. Pocket-knife. Pliers. Screw-driver. Can-opener. File. Ruler. The list goes on and on and varies depending on which exact model you get but it doesn't matter because whichever one you get: You'll use it. So get one.

- -

So there you have it fella's (and ladies).  My personal list of 10 tools every man who's a man should own.  If you have any that you would take away or add please comment about it with a little explanation of why!  Enjoy and remember that DIY season is only a few more days of cold away! Below is a list of upcoming DIY projects I'll be blogging on this spring.


  • Indoor herb garden
  • Cheap and easy flower gardens
  • Home oil, oil-filter, and air-filter change
  • Storage shelving

My Favorite Time of Year - DIY Season!

With March making it's presence known and the weather beings to warm up (slowly if you live in Spokane) I will be coming into my element, and with that will come a whole slew of new blogs and adventures.  For those of you who don't know me, or at least not very well, please allow me to give a little background on myself and my passion for spring and summer.

I spent my childhood working on my best friend's farm.  I liked it so much as a kid that when I graduated high school I went all the way back to Kansas just to spend the summer working there one last time. Obviously, farm life is definitely not for everyone, but for those who enjoy it; the mentality you get there never really leaves you.  Living and/or working on a farm for any amount of time longer that a week brings about many inevitable life lessons that I personally think that everyone should experience (if you're interested in just how much I think everyone should do this, click here). 

Arguably one of the most important lessons learned on the farm is that you need to learn how to do as many things as possible yourself. Time is money, the saying goes. And when you're on a farm and something is broken you either have to fix your yourself or waste money and time (which is again money) paying and waiting for someone else to fix it.  The other side to the skill is the ability to create things yourself. Another good ole' farm mantra is "I can fix/make anything with duct tape and bailing wire."

This mindset of do/build/fix anything you can by yourself in combination with being raised by my dad, somewhat of an amazingly skilled handy-man instilled in me this passion for doing everything myself. I find almost nothing more aggravating than having to buy something I could/should build myself of pay someone else to fix something that I don't know how.  For that reason, among many others, I have decided to start blogging about my DIY projects and home repairs.

It is my hope that somehow this might help me generation get back a little of the "do-it-yourself mentality" and save a little extra coin along the way. So, start looking for things towards the end of this month as it finally begins to get warmer outside. 

Hard Camera Case DIY

Hey Everybody!

Ran across this the other day and thought I'd give it a try.  It turned out not too bad so I'll pass it along to y'all (yes I just said y'all).

So depending on where you look and/or what camera you have, hard cases be tricky to find and often times pretty pricey.  Depending on quality, you can find hard cases on Amazon starting around $40-50 up to as fancy as you want to get.  The problem I find on many reviews of these products is that people buy cases and it turns out their cameras don't fit in them very well, or they have fairly limited space (more commonly on the cheaper cases - usually room for the chassis and a lens or two...).

For a guy like me, on a college budget and finding it hard to justify buying a quality case, this DIY is perfect. It basically gives me an expandable hard case, custom fit to my camera and lenses.  And the best thing? Cost me about $20 in foam.  Second best thing?   Super easy.

First things first, you need your B.O.M. or Bill of Materials (thank you Jerry for that wonderful term). 
  • Old Suitcase - these are technically antiques in some cases so check out yard sales and garage sales to catch them for a decent price.  Luckily for me, Reina has a few lying around.
  • High Density Foam - each case is going to be different as far as size and depth but I recommend getting a high density foam.  For mine I got three 2"thick pieces.
  • Tacky glue
  • Sharpie
  • Scissors, sharp knife, or electric meat cutter (clean those if you use them...)


Step 1:
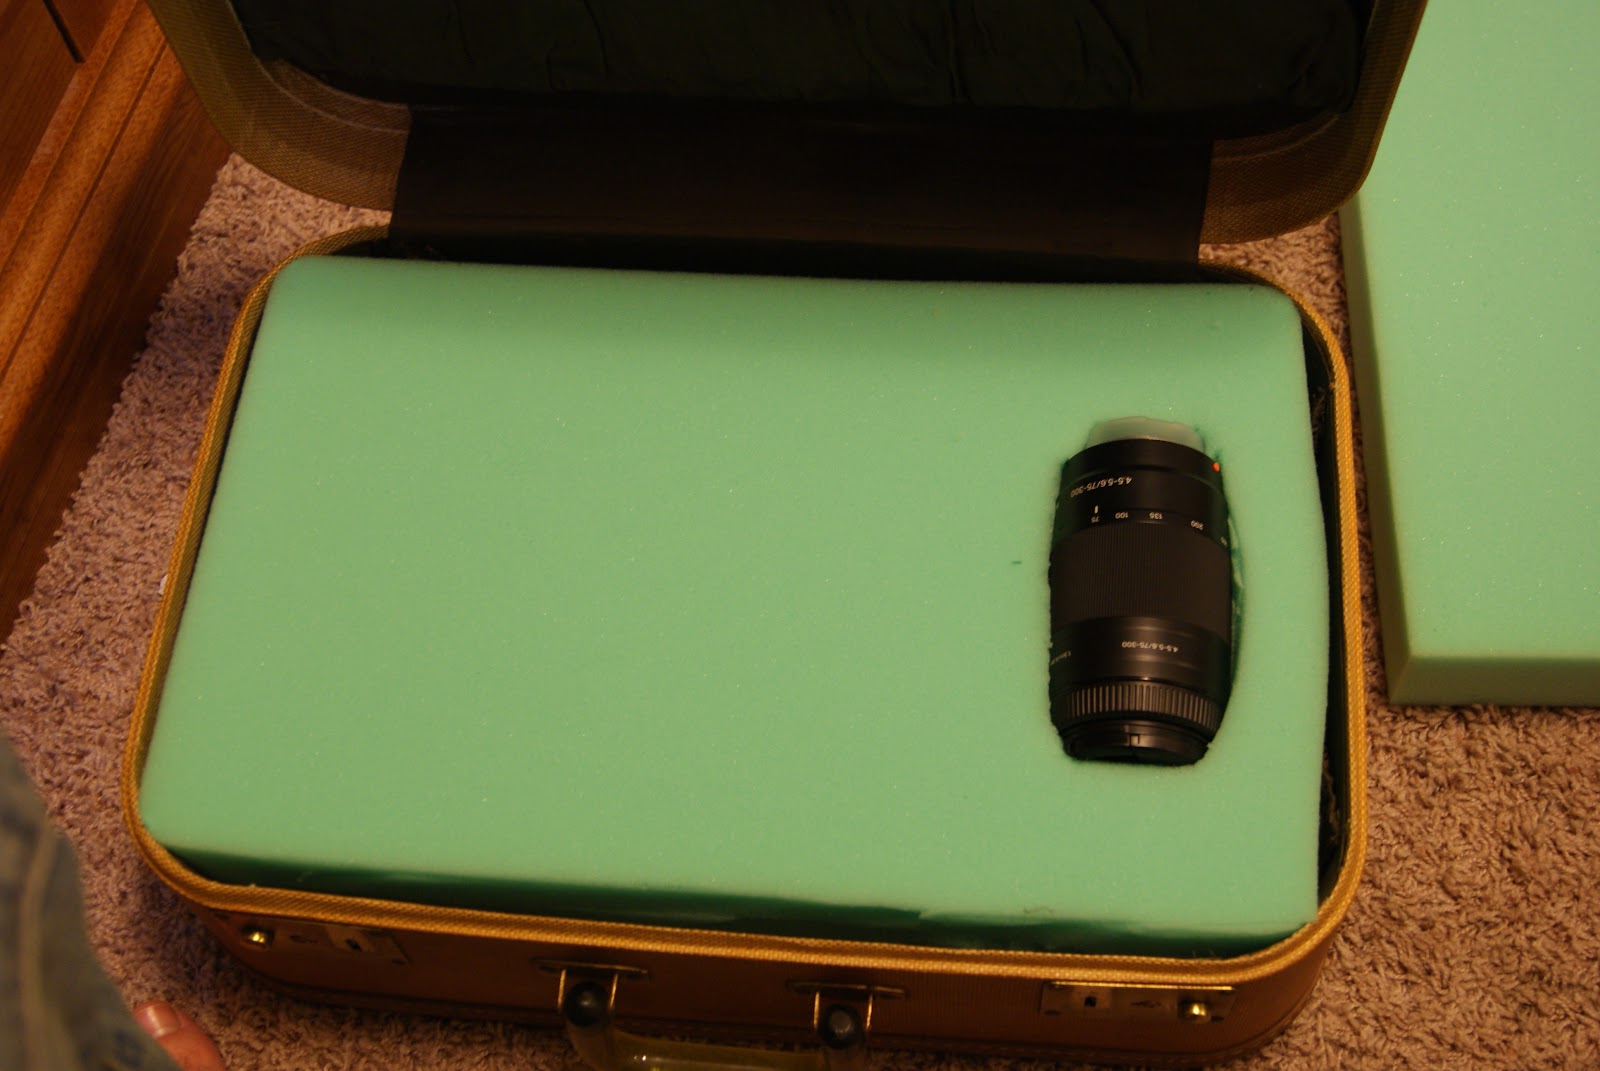
Cut your foam so it is snug in the bottom of the case.  For this reason I recommend getting foam in pieces about an inch or so bigger than the case itself. My particular case took two pieces of the 2" foam, which turns out to be the best situation.

2 layers of foam


Step 2:
While the foam is in the case. Position your first item, whether it be a lens or the chassis, and lightly outline it in Sharpie being incredibly careful not to mark your camera equipment.  Make sure that you make the outline a little bit smaller than the actual piece of equipment. You want the fit to be snug so it won't pop out.  The snug-ness is the security in this case.

Remember, slightly smaller than the actual item.


Step 3:
This is the tricky part.. kinda.  The foam is kind of difficult to cut the way you want it.  I started off trying to use scissors and quickly gave up in favor of a sharp knife. I've read of people using electric meat cutters and I think that might work better but as it turns out... I don't have one.  So, cut out the foam and don't worry about how clean it looks. Once you get it in there it looks fine and eventually it will wear down to a cleaner look.

See? Nice and pretty.


Step 4:
Much like shampoo, you simply rinse and repeat... minus the rinsing part of it.  Make sure to arrange the cut-outs so you can cut more out if you so choose in the future.  If you don't plan on expanding your equipment utilize the space so things are evenly spaces to prevent over crowding.

I left space for my wishlist below the chassis and 18-55mm.


Step 5:
Finally, after making sure everything fits correctly remove the x amount of layers of foam.  Starting at the bottom of the pile use healthy amounts of tacky glue to attach the foam to itself and the bottom of the case.  For the top of the case, I highly recommend the type of foam that looks kind of like an egg carton so it's less pressure but the same amount of protection for your equipment.  Unfortunately JoAnns didn't have any of that today so I used the normal foam and left it unglued so eventually I can replace it.  After that you're now the proud owner of a home-made hard shell camera case!


Hope this helps you!

DYIs to come!

One thing I've noticed about my generation (and even a little bit in my parents generation) is the lack of ability to do things ourselves.  A perfect sample of this is actually a couple I know that live in Southern California.  They jokingly talk about their handyman "Jesus" - no joke - who will fix/do anything from landscaping projects to changing light bulbs. I pick fun at people who I love dearly, and I do so because I know that this is more common of a thing (in varying degrees) than you would think.  One would think, that with an entire cable channel devoted to DYI projects people would be more willing to tackle things themselves, but in reality I think it just gives them ideas to tell "Jesus" to do.

There are a few problems I see with this, but most importantly is the cost of it.  Rarely can you find a handyman who works for free, unless you know them.  And between burnt out light bulbs and lawn maintenance visits the costs of these handyman can easily reach into the thousands annually.  This is great for the handyman, but living in an economy like ours it's hard to rationalize spending thousands of dollars on things that you more likely than not are more than capable of doing yourself.

My dad, Stan, taught me more than I could ever say.


I asked my dad why he thought people were resorting to hiring handymen more and more rather than doing things themselves and this is what he said: "I figure people are just afraid of trying."

BAM! Mind blown!!

I realized how true this was in my own life and it hit me.  If I hadn't of grown up working on my friends farm and my dad making me help on home-projects that ranged from laying a deck to putting in our own sprinkler system I would have been in the same boat. To be completely honest, sometimes I still find myself in the same boat.  I look at something that I think would be incredibly cool to try and find myself thinking that there is no way I could do that.  Yet in all reality I have nothing to lose in it.  All I have to do take a leap and risk it.


The Vaughan Family Ranch:
where I discovered the wonders
of duct tape and bailing wire.
My dad taught me the basics of carpentry; right angles, the benefits of toe-nails, levels, screw-guns, and the political incorrect adage of "Chinese carpenter: cut three times, still to small!" Working on the farm taught me the miracles of bailing wire and duct tape as well as forcing me to tackle projects that sometimes seemed to big simply because there wasn't anyone else other than me to do them. 

By no means am I claiming to be a qualified carpenter, plumber, electrician, or stone mason.  I might be able to get away with making a career out of landscaping however... What I am saying is my dad has done a great job at teaching me how to do chores that most people would have to call a handyman for.  Therefore I've decided to document a few DYI projects that I've got lined up for the apartment to show you how easy they are.  These are going to be projects that anyone can do with the most basic tools (and if you don't have them you can rent them for cheap at Home Depot, Lowes, or Ace - though I would recommend trying a local hardware store to promote local business and build relationships with people who are more capable than I at answering any questions you have).  They're also going to be projects that a lot of college kids and 20somethings would find useful and helpful.

Hopefully they'll be as beneficial to you as they were to me! Hopefully my first one; Adding Shelves to a Storage Room, will be up towards the end of the month with more to follow soon!  Definitely once spring hits there will be plenty of projects I'll be busying myself with and sharing with you!

Until then,

Cheers!