Real Food Challenge Photo Petition!


Oh my goodness it seems like it's been months since I've last posted anything on here! I beg your forgiveness (because I know ALL of you were waiting on the edge of your seats all summer for this post to appear)! With the break for summer came a necessary break with the majority of my work with the EWU Sustainability Project, which serves as the main source of material for my discussions on being environmentally friendly and living a sustainable lifestyle! But, now that school has started back up again and I'm caught up enough to spend an hour or so writing I've decided to let you in on a cool event that we -the EWU Sustainability Project - did on campus last month!

For those of you who didn't already know, October 24 is National Food Day; a day which is a nation-wide celebration and movement for healthy, affordable, and sustainable food! It's a pretty cool day of the year that is beginning to gain traction, especially on college campuses and within green communities! If you forgot about it this year, or just hadn't heard of it, mark it on your calendars for next year so you can find a local farm, co-op, or market to volunteer with and help share the benefits of REAL food!

The EWU Sustainability Project definitely didn't National Food Day out this year! As a part of our on going goal to see Eastern Washington University sign the Real Food Challenge and get 20% of all food served on campus to be REAL Food by the year 2020 we partook in the Real Food Challenge photo petition.

Instead of standing around asking students to sign a paper petition showing their desire to see 20% of all campus food be REAL, we walked around campus with a whiteboard and a camera asking students, faculty, and anyone else we came across to pose with their own personal reasons for wanting REAL food on campus. The pictures we collected were sent to the President of the school with a letter indicating our desire to see him sign the Real Food Challenge as well as posted on our group Facebook page and the Real Food Challenge website! (With the participants permission of course!). We had so much fun and met so many great people with as many great reasons for wanting to see more REAL food on campus. Below are a few of the most memorable photos from the day!

What's Your Reason!?


My lovely Fiancee, "because she cares about
the environment!"
Good ol' Farmer Griffin (me)


She's real! Why wouldn't she
want her food to be too??
His tummy controls his mind!
We don't want fake thoughts running around!


By far, the best picture of the day. There reason was so that WE
could live as long as THEY are. Aren't they awesome?


Throughout the afternoon we came across a wide range of people. From freshman to senior citizens, student to faculty members, and Eagles from all different backgrounds, every person we talked to - while not always wanting their photos taken - had a reason for wanting to see more REAL food campus. Having our campus smack in the middle of one of the county's most prominent agriculture regions definitely lends itself to a heightened awareness of the need for more REAL food in all of our diets and a continued effort to see that played out on our campus, and campuses around the United States!

If you are interested in sharing your own reason for wanting to see more REAL food in your cafeteria, take a  picture of you with your reason on your campus and drop it in a comment below. I'll be sure it gets posted to the Real Food Challenge website!

Questions? Check out the Real Food Challenge FAQ section here or drop a comment and I'll answer it the best I can!

Salt Bark Chicken and Italian Fried Potatoes

Salt Bark Chicken and Italian Fried 'Taters


Good evening! So I figure it is high time that I finally put a cost-efficient recipe up on my blog! As I was starting dinner tonight I was slapped in the face with the epiphany that the meal I was making would be a perfect recipe to share with all of you!

I am quite proud to say that it is a creation of my own making and over the past year I have perfected it to the point of food-ecstasy. Tonight's rendition was the best yet and I have hopes that it will only get better from here. The best part of this meal is that it is incredibly easy and incredibly cheap. I don't typically use exact measurements and recipes, but I will do my best to provide you with one. Let's begin, shall we?

**You'll see that the instructions are rather wordy. I write this mainly for beginning chefs and the extra hints, tips, and descriptions are geared towards them. For those of you who are well-taught in the ways of cooking, please feel free to skim for the important parts - it's a fairly straight forward recipe and easy to put together if you have some experience in the kitchen. **

 Ingredients

  • 1 Chicken Breast per Person 
  • Salt and Pepper
  • Extra Virgin Olive Oil (If you're not worried about calories, veggie oil makes it even better!)
  • 6-9 Medium sized golden and red New Potatoes
  • Oregano
  • Garlic Powder
  • Rosemary
  • Basil 
  • Red Pepper

Step 1:

The first thing that you have to do, for the sake of timing, is take your new potatoes and dice them into cubes just under an inch in size. Toss them into a fry pan with enough Extra Virgin Olive Oil - or as my good friend (not really) Rachel Ray calls it, E-V-O-O - to lightly coat the majority of the potatoes. It might take a few attempts to perfect the amount of oil you need. You don't want it too dry because it might burn the potatoes. On the other hand, too much makes them overly oily and quite soggy; and no one likes soggy potatoes. 


As soon as you start the potatoes, you need to put enough EVOO to lightly coat the bottom of a fry pan. Heat the oil over medium-high heat until it starts to shrink away from the edges of the pan - you'll think I'm crazy until it happens and you'll know exactly what I'm talking about. Once that happens, plop your chicken breast right into the pan and get your hand out of the way. The chicken should start hissing and spitting and you don't want to get burned with hot oil. *If your chicken doesn't start sizzling immediately, fear not, it will in a few minutes.

Sorry, no pictures for this step. Didn't hit me until the next step that I should do this blog and take picture.

Step 2:

After two minutes or so you'll be able to see the beginnings of a nice golden brown on the underside of your chicken. At this point you should take a healthy (by healthy I mean unhealthy) amount of salt and pepper and sprinkle it on the up-facing side of the chicken before flipping it over. Again, be careful of the firestorm of burning oil at this point.

This is the sight that will greet you upon first flipping of the chicken. It's already looking delicious, in an odd, raw-chicken sort of way. It's important not to forget about the potatoes. The trick with them is to find the balance between letting them sit, acquiring  that nice golden brown and keeping them moving to prevent them from burning. This is something that cannot be taught over the interwebs and can only be learned through experience. If you burn your 'taters... fret not, because you'll get it. You just have to try again. 

Step 3:

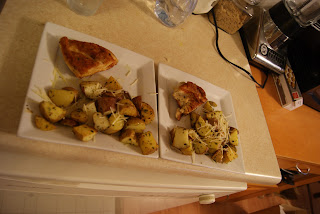
In order to get a good "bark" on your chicken, you should be flipping it every two or three minutes, applying a nice coat of salt and pepper each time. Now after you flip the chicken for the second time, your potatoes will be about ready for seasoning. All you have to do is take your spices (oregano, salt, pepper, red pepper, garlic powder, rosemary, and basil) and sprinkle them over the spuds and toss them a few time to evenly disperse the flavors. They should look a little something like this:

Step 4:

By now you have your pattern down. Flip the chicken, coat in salt and pepper, stir the 'taters. Unfortunately, you'll soon find that the temperature on your chicken has stalled out around 140 degrees. Technically speaking, they generally recommend that chicken be cooked to a temperature of 165 degrees. This is where you employ the handy-dandy cookie sheet trick. Take an old cookie sheet and set it on top of the fry pan in order to trap in some of the extra heat and put that temperature back on the rise.


A little word to the wise, when you go to flip your chicken (because you'll still need to flip it in order to prevent it from burning the bark) remove the cookie sheet with some tongs. That cookie sheet gets surprisingly hot as it sits there.

As for the 'taters, turn down the heat and makes sure to move them every now and then until the chicken gets up to temp. 

Step 5:

Now that your 'taters are done and your chicken is up to temp it's time to plate it up and chow down! The whole process is only going to take 15-20 minutes before your sitting down at the table and stuffing your face with delicious food :) I hope you enjoy!


Capote


Before you continue, I must provide this disclaimer:  I wrote this post originally for my other blog (it has to do about my adventures as a wanna-be writer - check it out here) so it's going to be a slightly different feeling post. My language and tone is going to be slightly different and most noticeably will be the absence of capitalization. Don't ask me why; I just don't feel like capitalizing  on my other blog. This is however, a film I watched on Instant Netflix so here it is! Enjoy!
- -

it is rare that i sit down to watch a movie, and find myself scouring the kindle store for a specific book as the credits roll. rare, but not non-existent. such an event happened this very morning... the coincidence of said coincidence and this post is shocking, i know, but let me tell you all about it.
image from imdb.com
i remember quite a buzz about the entertainment world when this movie first came out seven or so years ago, but was too young (13 or 14) to watch such a film, let alone appreciate it. as i have grown, along with my passion for literature - especially dark and edgy literature - this film has stayed on my radar screen waiting for the right time. a week or so ago i realized that it had shown up on my instant netflix queue as a recommended movie. i didn't have the time to start it just then, as i knew it would warrant my full attention, and made a note to watch it as soon as possible.

this morning wasn't exactly the ideal time, but as i was looking for something mindless to turn on for noise in the background as i worked, i couldn't turn away from it. i knew that it was going to be good, but i seriously underestimated just how much it would touch me.
now, when people say a movie or song or book "touched them" it tend to think of an emotional lovey-dovey, nostalgic kind of connection; not the raw, gut-wrenching, draining experience i had at the hands of this story.

for those of you who know nothing of truman capote, or his non-fiction novel in cold blood, i will tell you enough to get you interested without spoiling anything. below is the description from imdb.com followed by my own, slightly more detailed and interesting synopsis.
truman capote (hoffman), during his research for his book in cold bloodan account of the murder of a kansas family, the writer develops a close relationship with one of the killers, perry smith.
what the official movie bio doesn't tell you, but you quickly realize, is just how much of an emotional journey captoe takes as not only a writer but a person in general. what makes this film so exquisite is how well it connects you on multiple levels with capote via hoffman. during many points in the movie i felt myself chuckling to myself and at others, on the verge of tears. to say that i found myself on every stop of the emotional spectrum would both be a hyperbole and an understatement. to say that would imply a sense of cheesiness that would betray the raw side of humanity that this movie shows.
as phenomenal as the writing of this film is, the true reason for such a connection with the audience is the lead actor: philip seymour hoffman. hoffman has played roles in a few of my favorite films (most notable of which include; pirate radio, moneyball, and the big lebowski) and as such i am no stranger to his merits as an actor. after seeing this movie though, i can say that this, hands-down, was the role of his lifetime.
as much as i would like to continue ranting and raving, i cannot do so without boring you to tears or spoiling the rest of the movie for you. regardless, it caused me to instantly download the book the film is about (in cold blood - for those of you who can't remember) and want to recommend this to all my literature-loving friends and readers. and so, without further ado, i bid you this:

go to instant netflix right this instant and watch capote. grow as a person and as an appreciator of fine literature. then! go get the book and grow even more!

official rating: 9.5/10!

Pallet Display Shelf

Alright everyone, as promised I have already started in on my laundry list of DIY projects, and after completing my first major one I figured I do a little post about it.

Reina had been bugging me for a while now to help build her a nice display shelf for all of her awesome things (she has tons of trophies being a really awesome Miss America Organization contestant - shout-out, she took 2nd place at Miss Washington this year!!!). We looked around online - and by online I mean Pinterest - and came across this little gem of a project. To be completely honest, I'm not sure who is the original creator of this design, but whoever it is, I give mad props to them because it looks amazing!

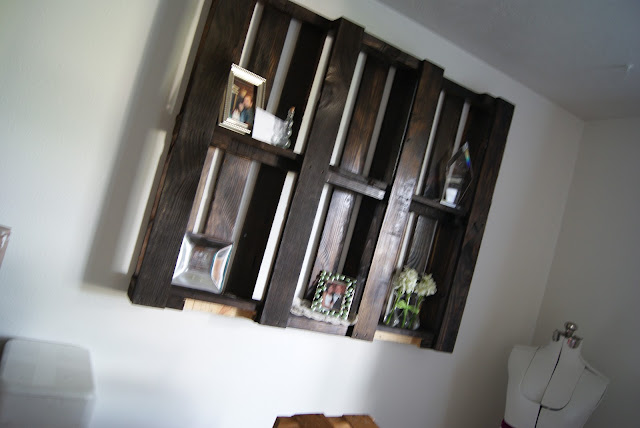
Before we get started I'll show the finished project first, so you'll be able to understand just how much you want to do this project. After you've basked in it's glory for a second or three I'll take you back to the very beginning and work you through it step-by-step all simple like.

Pretty awesome, huh?
I wish I had a picture showing the view of her dining room looking down the table, it completely changed the set-up and mood of the room. Personally, I think that's the best part about this particular project - the fact that such a ridiculously simple piece can completely transform your room into a professionally-designed look.

Alright, let's dive in shall we?

Bill of Materials (B.O.M.)

  • 2 pallets 
    • Technically you only need one, but more often than not the pallets you can get for free (at your local RiteAid or grocery store) are a little banged up and it's helpful to have an extra to take boards from.
  • Nails
  • Hammer
  • Wood Stain
  • Brushes of varying sizes
  • Drywall Anchors
    • These can be found in the "Fasteners" section of your local hardware stores. 
    • ***Be extra sure to make sure it's okay with your landlord to use these if you live in an apartment. They tend to make a pretty good mark in the drywall that can easily be covered in Spackle, but some places still say negative on drywall anchors. Unfortunately, I don't know of another way to fasten something this large on a wall...
  • Drill
  • Screwgun
Overall, the only out of pocket costs you should have - assuming you have the 10 Tools Every Man Should Own - will be the cost of stain, possibly brushes, and the drywall anchors. For us it was about $12, I think. A pretty fair price I'd say for the size of the project. 

Step 1: Making it look "pretty."

One of Reina's favorite requirements for the DIY projects we do together is that I make sure to "make it look pretty." Depending on the condition of your pallet, this step will vary in terms of time. Be sure to pick the better of your two pallets (common sense, I know) to use as the shelf. Look it over and make sure all the boards are there and that they're in good condition. 

A few things to note:

  • The Top of your Pallet: When I say "top" I'm referring to the surface that you would stack items on if you were using this pallet for normal uses. It is important to make sure all of the slats are there and in good condition. You don't want them to have any big splits because these are the boards you'll be using to attach it to the wall. Make sure all the boards are in great condition because you never know which one's you'll have to use until you actually go to hang it on the wall - trust me, I know.
  • The Bottom of your Pallet: The "bottom" is the part of the pallet that will be facing you when it is on the wall. This is your "shelf." Likewise, you want these boards to be in good condition because you don't want your vase, picture frame, or trophy breaking the board and falling to the ground. Technically speaking the middle crosspieces of the pallet will be your shelf, but the true bottom boards are just as important because they are highly visible. 
Now on ours, as you can see above, there were some chalked numbers that we wanted to make disappear. A sheet of 100 grain sandpaper (this, I just had laying around) and some elbow grease quickly made this happen. It doesn't take very long and if you don't want anything other than the actual wood showing, it's a good step to take. It's one of those "extra steps" that can really add a little bit of professionalism to your home. 

Extra Step: Cover Fork Grooves

This normally wouldn't be a step that I'd include, but it was a problem we ran into and I figure some of you out there might too. Our pallet had grooves on the crosspieces - the shelf part - that were for the forklift forks. Obviously we wouldn't be needing them and they diminished our shelf space significantly. If you're in the same position, there is no need to worry. As it turns out, the space between the bottom and top boards is exactly the width of a "top" slat. And, if you have an extra pallet, you can just pull two off of that and nail it down to the grooved crosspiece. 

Just use the back-end of a hammer to pry off the slats
You can still see the groove, but I think that it adds to it.

Step 2: Stain

Much like the first step, this one is almost disgustingly easy. All you need to do is cover your pallet in stain, and you don't even have to do the top side of the pallet because it will be against the wall. If you're thinking about doing it just because, I'd actually recommend against that decision. I'm not sure, but I worry about some of the stain marking up the wall; and that might make your landlord a little upset when it comes time to move out. Spackle is easy to look over, but brown scuffs all over the wall might make him/her a little irritated. As always though, your call!


Step 3: Hang!

After you've let your pallet dry over night it's finally time to hang it on the wall. Unfortunately it's a rather ungainly thing and you'll definitely need a second set of hands to help you hold it in position while you mount it. As such, I wasn't able to get any pictures of the actual mounting process, but it's fairly straight forward. Those drywall anchors you got at your local hardware store is rather self-explanatory and they have directions besides. Then you need to pre-drill your pallet before trying to screw it into the wall, you don't want your boards splitting the second you let go. This is the part that gets kind of tricky, but I have faith in you, you can do it.

Then you just drive the screws through your guide-holes and into the anchors. After that.... you're done! 

Please post pictures of your own! 


You're now the proud owner of your own pallet display shelf, unless you were just reading this because you saw it somewhere. In that case, go out and get some pallets and refer to the top of the page! 

As with any of the projects I post on here, if you have any questions, please don't hesitate to fire me an email or leave a comment and I'll get back to it as soon as possible!

Hope you all enjoyed it!

Cheers,

Upcoming DIYs!

Hey everyone! I know I've been really slacking on my DIY and money-saving tips/tricks, but it's been a pretty crazy start to the summer. Fear not however because I have not forgotten and I have a ton of fun things planned for the second half of summer!

Before I get to that though, I just have to give a HUGE shout-out to my fiancee who will be competing in the prestigious and awesome Miss Washington pageant in only 10 DAYS!!! No matter what happens I will be so incredibly proud of her (but between you and I, I think she's got a pretty stinkin' good chance!). So the next few days I'll be busy helping her prepare for all the festivities that start in a week. If you want to learn a little bit more about her or the organization in itself, you should definitely check out her blog. You can find that here.

Okay, thank you for humoring me. After I get back from the pageant in Renton (and even a little before that), the DIY projects will be in great abundance!! I'm taking this Friday-Sunday off and going to visit my grandparents/watch the pageant and I'll be spending almost an entire week working in my grandfathers shop doing this and that preparing for and even completing some of my up and coming projects. Needless to say, I'm pretty friggin' stoked!

Below are a few of the projects I want to do before school starts again in September. For those of you who simply cannot wait for me to do them and offer my own tips and tricks, most of the ideas come from Pinterest so cruise around on the to find these and many more projects to get started on!


  • PALLET BOARD BOOKSHELF

I find myself always bringing home books - I think it's some sort of disease or something - and as a result, I am in desperate need of new bookshelves. As a writer/English Major I need to have a stylish and personalized library area and so I have decided to spruce up my bookshelves to add a little of myself to them. Super stoked for this one!

photo and idea come from overthemoon.com!

  • CEDER-LINED CIGAR/JEWELERY/ANYTHING BOX

Ever since I was a little kid I've been fascinated with little trinket boxes. I was always saving up money and buying ones to put this and that in. I distinctly remember getting one with the stereotypical trashy wolf howling at the moon glossed on the cover. This and my recent interest in the casual cigar experience has led me to finally getting around to building my own. I hear these can be kind of tricky in terms of getting them all nice and square... but hey, that's what makes it personal right?? Sure hope so... 

eventually i hope to make one this intricate, but mine first one
will probably be much more simple

  • PLATFORM BED RISER

This one is probably going to be my biggest project of the summer, and is definitely the one I am looking forward to the most. As always with apartment living, I am hard-pressed for storage space and frankly my bedroom is a little unorganized. I like cool looking beds and this would definitely make my bedroom more trendy and efficient. This will probably end up taking me a weekend or two, which means I might be sleeping on the floor for a week or so (motivation to get it done I guess!).

more bookshelves! thank you pinterest.. and whoever pinned this first!

  • HANGING STORAGE FOR POTS AND PANS

One of the biggest problems every kitchen - no matter how big or small - faces is how to store your pots and pans. They take up an obnoxious amount of space and no matter what, there doesn't seem to be any good place to store them. Until now that is... Reina has a pageant friend who's brother is incredibly awesome at home decorating apparently and I'm and going to shamelessly steal his idea. The picture below is the closest I could come to finding what it'll be like. He basically took a really sturdy tree branch and hung it from the ceiling in his kitchen area and hung pots and pans from it making it an incredibly good lucking and effective way to store your pots and pans!

sorry this isn't exactly what i'm going to do.. but it's close enough to get the picture
There will probably be a few more little ones here and there, and hopefully a few money-saving tips and tricks as well but these are my major projects for the summer. If you have any ideas or requests for projects that you would like to see me try, definitely leave a comment below and I'll see if we can make it happen!

Cheers everyone,